
The Ultimate Shed Planning Guide: How to Choose the Best Location, Design, and Site Preparation
- Jeremy Horning
- Feb 1, 2025
- 4 min read
Updated: Feb 25

A well-planned shed can enhance your backyard’s functionality, add storage space, and even boost property value. However, the key to a successful shed installation lies in proper planning. In this guide, we’ll walk you through the three critical phases of shed planning: choosing the best location, designing your shed, and preparing the site. Whether you're setting up a small garden shed or a large workshop, this guide will help you make informed decisions to ensure a smooth installation.
Phase 1: Choosing the Best Location for Your Shed
The first step in shed planning is finding the ideal spot in your yard. A well-placed shed should be convenient, functional, and compliant with local regulations.
1.1 Assessing Your Yard Space
Before choosing a shed size, start by assessing your available yard space. Here are some important considerations:
Measure Your Space: Take accurate measurements of your yard to determine how much room you have for a shed.
Check for Obstacles: Look for trees, utility lines, fences, and other structures that may interfere with placement.
Plan for Accessibility: Ensure there's enough space to move equipment in and out easily.
1.2 Understanding Shed Permit Requirements
Many homeowners wonder, Do I need a permit to build a shed? The answer depends on local building codes. Here’s how to find out:
Check Local Regulations: Some areas require permits for sheds larger than 120 square feet, while others have stricter zoning laws.
Consider Setback Rules: Most cities have regulations on how close a shed can be to property lines, fences, or neighboring structures.
Contact Your Local Building Department: Visit their website or give them a call to get clear guidelines on permit requirements.
1.3 Finding the Best Spot for Your Shed
Once you've confirmed legal requirements, it’s time to select the perfect location. Here are some tips:
Choose High, Level Ground: Avoid low-lying areas that collect water to prevent foundation issues.
Consider Sunlight and Shade: If you’re using the shed for gardening or a workshop, natural light is essential.
Think About Drainage: Ensure the area has good drainage to prevent water damage.
Phase 2: Finding the Perfect Shed Size and Design
Once you have the right location, the next step is designing your shed to fit your needs.
2.1 Determining the Right Shed Size
The size of your shed should align with your storage needs and available space. Here’s a quick guide:
Small Sheds (6’x8’ or 8’x10’): Great for storing garden tools, bikes, or small equipment.
Medium Sheds (10’x12’ or 12’x16’): Ideal for lawn equipment, motorcycles, or a small workspace.
Large Sheds (14’x20’ or bigger): Perfect for workshops, home offices, or large storage needs.
2.2 Choosing the Right Roof Style
Your shed’s roof style affects both aesthetics and functionality. Here are two popular options:
Modern Single Slope: A sleek, contemporary design that allows for water runoff and solar panel installation.
Traditional A-Frame: A classic design with excellent durability and snow-shedding capability.
2.3 Picking the Best Siding Material
Your shed’s siding not only affects its appearance but also its durability. Consider these options:
T1-11 Plywood: A budget-friendly, durable option with a natural wood appearance.
LP SmartSide Lap Siding: Engineered wood siding that resists moisture and decay.
Board and Batten: A rustic, farmhouse-style siding with vertical wooden boards.
Western Red Cedar: A premium choice with natural resistance to rot and insects.
2.4 Planning Doors and Windows
Strategic placement of doors and windows improves accessibility and ventilation. Consider:
Double doors for easy access to large equipment.
Windows to enhance natural light and airflow.
Skylights for additional lighting in workspaces.
2.5 Visualizing Your Shed with a 3D Configurator
To experiment with different shed designs and pricing options, use our 3D Shed Configurator. This tool lets you customize your shed’s dimensions, roof style, siding, and color before making a final decision.
Phase 3: Choosing the Right Site Preparation Option
A solid foundation is essential for a durable and stable shed. Here are three site preparation options to consider:
3.1 Regular Concrete Blocking (Best for Small Sheds on Level Ground)
A budget-friendly and simple solution.
Ideal for small sheds that don’t require extensive leveling.
Can be selected in our 3D Shed Configurator.
3.2 Stone Base (Best for Medium to Large Sheds)
Provides excellent drainage and stability.
Ideal for sheds in relatively level areas.
Enhances durability and aesthetics.
Available in our 3D Shed Configurator.

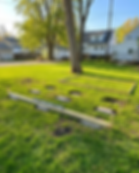
3.3 Retaining Wall Foundation (Best for Sloped Yards)
Necessary for sloped terrain to create a level foundation.
Custom-built for your yard’s specific needs.
Requires professional installation. Contact a shed installation expert for a quote.

Final Steps: Get Your Shed Project Started!
Now that you have a detailed shed planning guide, it’s time to take action. Here’s what you can do next:
✅ Use our 3D Shed Configurator to design your ideal shed.
✅ Check local permit requirements to ensure compliance.
✅ Choose the best site preparation option for stability and durability.
✅ Connect with a shed installation expert to finalize your design and secure a spot in our construction schedule.
Send a Message to a Shed Installation Expert Now and let’s get your shed project moving forward hassle-free!
Final Thoughts
Planning a shed doesn’t have to be overwhelming. By following these three phases—choosing the right location, designing your perfect shed, and preparing the site properly—you’ll set yourself up for a smooth and successful installation. Whether you need a small garden shed or a large workshop, taking the time to plan will ensure your shed is both functional and long-lasting.
Have any questions? Reach out to our team—we’re here to help!